The Top 10 Tools You Need to Solder Sterling Silver!
(updated)
Soldering sterling silver is so much fun! Plus you’ll find you can create much more unique jewelry, which will make your handcrafted pieces stand out from the others!
1. Soldering Board
Setting up for soldering requires a heat-safe surface. Safety is key… make sure you have the proper surface! I use 2 stainless steel wire mesh stacking kiln shelves with 1 soft fiber kiln shelf on top. I find it easier to use these shelves as they don’t leave black marks on my hands and tools like the typical soldering charcoal block, plus they double as my kiln shelves and don’t take up much room. I purchased my shelves from Metal Clay Supply for a mere $6 – $9 per piece.
Another, more traditional, option is a soldering fire brick. It’s great for soldering sterling silver plates, fine silver head pins, or your PMC pieces!
2. Sterling Silver
If you’re going to solder sterling silver, you need some sterling
silver! For most of my ear wires and jump rings, I use round sterling
silver wire, 20 gauge. I purchase my silver wire from many places, usually I hunt around for whoever has the best deal the day I’m ordering. Artbeads, CoolTools, RioGrande or even on Amazon. You can usually purchase 1/2 ounce spools of wire, or by the foot if you’re just starting out and need to keep your costs down.
3. Silver Solder and Flux
In wanting to keep my process simple and cost efficient, I’ve found a marvelous product that includes both solder and flux, silver solder paste. I started out using “easy” paste, which melts at a lower temperature and will be all you need to solder 20 gauge wire. I usually purchase my silver solder paste in 1/2 ounce tubes. Only using a tiny pea-size blob on each soldered joint, this stuff goes a long way! This paste is so easy to use, and doesn’t create a mess when soldering. Plus you don’t have to add a separate flux when you’re soldering, which makes it that much easier!
4. Torch and Fuel
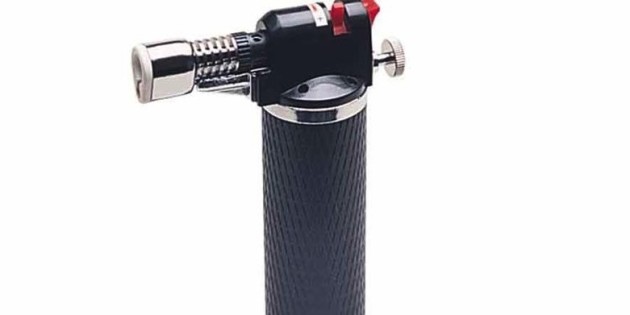
You need a heat source to solder silver. I use a butane torch with refillable butane fuel which can handle your smaller soldering needs when you’re first starting out, such as ear wires and jump rings. I chose the smallest torch I could find when I first started out (called a pencil torch) as it was easier for me to handle, lightweight and easy to store. Not to mention I was nervous to purposefully start an open flame in my house, but with some practice and my kitchen extinguisher close by, I lost my fear rather quickly. I purchased a bit larger butane torch after some frustration with my small pencil torch and I’m happy to say the upgrade has proved very useful.
If you can swing it, and you’re ready for a “big-britches” torch, I love the Smith Little Torch. I use propane with oxygen.
5 & 6. Fire Coat: Boric Acid & Denatured Alcohol
Before soldering, you need to prep your silver as to not allow any “burns” on your metal. I use a half and half mixture of boric acid and denatured alcohol in a glass jar with an air-tight lid. (Caution: flamable! So keep that lid on tight when not in use!) Using metal tweezers, simply swish your silver in the fire coat, then flame off with a lighter or match. I purchase boric acid (powder form) from Cooltools for $6 per 4 ounce jar, and denatured alcohol from Walmart $5 (in the paint thinnner section). Ps… Keep a fan running in your studio when fire coating and soldering so as not to inhale any fumes.
Another great option to fire coat your silver is Handy Flux. It works great to protect your piece from fire scale, also helps to “glue” your silver together when you’re getting ready to add solder (keeps solder chips from flying around when heating).
7. Lighter or Matches
I use a fireplace or a camping lighter to flame off the fire coat while prepping my silver. You can use a striker to light your torch flame if you’re using a traditional jeweler’s torch or if your butane torch does not have a built in lighter or ignition.
8. Tweezers
Tweezers come in very handy when soldering, they help you hold your silver pieces in place when they’re too hot to handle. I chose to work with cross-locking fiber grip steel tweezers as they offer a heat-resistant grip and a curved tip, which makes picking up silver pieces off my soldering board a bit easier. Plus, I really enjoy the cross-locking feature because I don’t have to keep a steady “squeeze” on the handle. I love these!
9. Silver Prep or Pickle
After soldering your sterling silver, you’ll need to remove the oxidation (darkening) that’s left behind on your pieces in order to make your sterling silver shine. I use Silver Prep (powder form) from Cooltools for $8 for an 8 ounce jar. I enjoy using this pickle mix as it is natural and non-toxic! Using 1 tablespoon per 1 cup distilled water (this powder goes a long way). Heat distilled water in a small cooking crockpot that you’ll use only for your silver prep pickle mix… don’t cook food in this pot after pickling! After pickling, your silver can be polished to a nice shine.
10. Steel Block and Hammer
Anytime during your soldering process, if you want to flatten any part of your silver, you’ll need a steel block and a small hammer. I found my steel bench block (4″ x 4″ x 3/4″) for $19, (and I think they’re actually cheaper now.) You can purchase larger blocks for more. If you’re wanting to shape your silver into rings, bracelets, or necklaces, you’ll need steel mandrels for each, which can run from $20 on up.
Thanks for checking out the top 10 soldering tools I can’t live without!
Now… Go try it for yourself and let me know with a comment below the tools you love and how they’re assisting your creations!
Got any tips for tools that I missed in this list and should have shared? Please let leave a comment below and let us in on your knowledge!


15 Comments
Jamie
Hi was wondering if I can use an old sterling silver ring instead of buying the 20g silver wire ? Can I recycle the old ring and use that as my silver solder???
Cris
Great tips! I am so happy I found these valuable guide to fix all great sterling silver jewelry. Do you also teach on how to do it. I am very visual! Thanks so much
wendy
I’m buying the tools you suggested for my son for Christmas. He already makes lamp work beads and has a torch. Can he use the same torch for soldering?
laura
What a wonderful Christmas gift! It depends on his torch setup, I’m not too familiar with the lamp work bead world, I’m sorry. He may just need a different hand piece depending on what he already has.
Barbara
Wow. Great tips. Looking forward to more.
Lisa
Hi Laura,
I’m new to creating jewelry and loved this blog. I tried to sign up but it says I’m already a subscriber. If I am, I’ve never received your blog before. I stumbled upon your page by accident looking for soldering info today. Please re-subscribe me with Lisa@JCKDesigns.com I’ve worked with micro macramé, beads, and stones, but now venturing into metals too. I love the simplicity of your website. Good luck with your children. Mine are now all in their 30’s with one almost 40 and I’ve moved on to grandchildren….loving life.
Thank you, Lisa
P.S. I create because I just have to too!
Kai
I live in a small apartment and don’t have a place to set up a “studio”. I have been making the silver wire rings for a while, but I’ve never gotten the tools and tried soldering. Do I need a special place to work on it? Or would it be safe to do this in my apartment? Thank you for the post! Great info! :)
laura
Yes you should create a little studio spot for your soldering! Make sure to have a fire extinguisher handy and have good ventilation. I would avoid creating where you eat, such as the dinner table or kitchen counter. Get a little TV tray or pop up table or desk that you just use for soldering. Use a fire safe surface under your soldering block or board, like a cookie baking sheet or a sheet/block of wood to help keep your area safe. Good luck!!
Maria A
For me the plastic tweezers, to pck up yor work from the pickle bath, is indispensable!
Rita Bailey
Very helpful information. What I’m trying to find out is how to make a specific mold I have in mind. I’m not an artist so I need help with that. Not really sure how to go about it. What I’m trying to do is make a set of three different charms with a specific theme.
Chris
You could use wax or cuttlefish. Thecuttlefish will need a lot of finishing though if you dont want a wavy pattern in your work.
Megan
Thank you so much for this post! I’ve been doing research as I want to start making rings to add to my etsy shop and I loved that you listed where you got your supplies and about how much they cost. So helpful!
Delbert
I’m really enjoying the design and layout of your blog.
It’s a very easy on the eyes which makes it much more
pleasant for me to come here and visit more often. Did you hire out a developer to create your theme?
Fantastic work!
LC1
Thank you so much Laura, these were very helpful suggestions! We are in the midst of preparing our shop as it were and although we’ve watched a video or two giggles, well; suffice it to say that having a list of the needed tools will certainly come in handy!!!
Sincerely,
laura
You’re welcome… I’d love to see some of your work and how you decide to set up your shop! Have a happy day!